Friday, November 16, 2012

Diamond Lattice

This is my favorite way to do a woven lattice... well, that being said, there are several different ways that I do it, and it's a little different every time!  So here is ONE way to do a woven lattice.  ;)  I've called it a 'diamond' lattice because I parted the sections of her hair in diamonds.  This style looks absolutely beautiful on long hair... I did (a variation of) this style on my daughter and my (then) 11-year-old niece last Christmas when they were angels for a church play; they looked so sweet!!!  It's done the same way on short hair; the result is just a bit spunkier.  :)

Start with the hair all combed back towards the back of the head. The front section is less of a diamond and more a triangle.  Part this out and secure it with an elastic: 
From the tip of the triangle, continue the part over to her ears on each side at a bit of an arc.  Divide each of these new sections into two shapes resembling diamonds and tie them off.  You now have five sections, like so: 
Here's a side view: 
Now go back to the middle.  I clipped the front triangle section out of the way for this.  Part out another triangle, just behind the first one.  Add half of the two sections on either side (but in front) to it, and tie it off: 
Do the same thing to the left of the new triangle, only make a diamond now, just like you did at this point in the front: 
Continue the part down, parallel to the first part across the head, to create one last section, adding in the rest of the hair from the section in front of it: 
Do the same on the other side.  You now have 10 sections altogether (5 in the row in front, 5 in the row in back of that).  Now unclip that front triangle section's hair.  Make two little sections at the back, adding half of that front section into each.  Also add in the last little pony (down by the ears) on each side.  It sticks out funny if left to its own devices.  ;)  You're done!  You'll end up with five little ponies in the back. 

Have a great hair day!  Enjoying the colder weather yet?  ;)

Monday, November 12, 2012

Ribbon as a Headband

There are many ways to get a ribbon to stay in place and act as a headband (as it seems intuitive that it really should be able to do on its own; alas, I've never met a ribbon that does).  This is one of the ways that Little Miss and I have experimented with lately.  She wore a version of this to be Alice in Wonderland for Halloween this year (with a light blue ribbon), and it would also work nicely for Snow White (with red).  It's also pretty as an everyday style, and you can use almost any width of ribbon.  Shoot, it's even a cute style without the ribbon in it!  You'll see what I mean...

Begin with a part down the center of your model's head.  From there, do a part from ear to ear, over the top of the head.  Part that off into four sections and tie them off with an elastic each.  The ear-to-ear part below is crooked on the right; I fixed it before I went on, but didn't take a pic of it fixed...
Then do a pull-through with each of the four sections: 
Next, part out a little square behind each of the current four squares, and tie them off, including the hair from the square in front of each: 
Finally, do a pull-through on those last sections (all four): 
You've now created a path for your ribbon.  It's a cute style on its own, though, and you could stop here if you wanted!  But if you'd like to add ribbon, "thread" a ribbon through your Topsy Tail, and go underneath each tied-down pony of hair, as shown below: 
Finish with the two ends of ribbon on top of the head (or off to the side, if you'd prefer a side bow), and tie a bow: 
Ta da! 
Have a great hair day! 

Friday, November 9, 2012

Pull-Through Squares

This is a more involved variation of the pull-through waterfall style.  A fun 'do, and it lasted for longer than a day, which is always nice to have as an option when you're busy!  ;) 

Start with a side part:
Part out a little square just to the side of the part, and do a pull-through, angling it towards the corner, as shown in the picture below: 
Part out another little square just behind the first.  Before you tie it off, add in half the hair from the first pull-through (leaving the other half hanging down).  Then do a pull-through...
Continue this pattern for another two squares (or as desired), until you have a row like this...
Now back up to the front of the head.  Part off a little square (getting the theme here? ;)  ) to the side of the first square in front.  Before tying it off, add in the hair hanging down from the first square.  Then do a pull-through... 
For the next square, add in BOTH the hair from the square it's next to in the previous row AND half the hair from the square in front of it.  Continue this for another two squares, until you have two full rows: 
And finally, do another row just like the second row.  You will have hair hanging down on the side of her head (the right side, in this case), but not in the back.  (Or you can choose to try it leaving hair out in the back, too!) 
 Have a great hair day!  ;) 

Friday, November 2, 2012

Easy Woven Pull-Backs

This style incorporates the same weaving technique as our Spiderweb Hairstyle, but on a much simpler scale.  And can I just say... We have sides up for pull-backs, people!  That's right, and without step ponies to help!  Okay, yes, I get excited about the little things, but I am thrilled with every millimeter of length that Little Miss' hair grows back!  She's been saying she misses her long hair; not sure if she can just tell that I do, or if she really does, or both, but hey, I'll take it!  :)  I'm sure I've seen variations of this style online somewhere, so as always, I apologize if I'm posting your style and not giving you credit! 

Start with four little squares up front, and tie them off with elastics.
And sorry, I didn't take step-by-step pics for the next parts.  But hopefully you can make sense of it all by looking at the pics below of the finished product.  Make an ear-to-ear part across the top of the head, and divide that hair into two pull-backs.  Tie them off with elastics, leaving out the four little ponies up front.  Next, take the two little ponies on the right and join them to the pull-back on the left.  Take the two on the left and, using a Topsy Tail or a plastic craft needle (not sharp) or your fingers, cross the first little pony OVER the first from the other side, then UNDER the second.  Do the opposite with the other little pony on the left.  Join them to the pull-back on the right.
Add bows, and you're off!  With winter approaching and days getting shorter (and colder), we're trying to find the best place to take pics inside, since it's still not light out and about 30-40 degrees F out when she leaves for school in the mornings!  So bear with us as we try different spots... :)

Have a great hair day!

Tuesday, October 30, 2012

Spiderweb Hairstyle on Short Hair

Happy Halloween (almost)!  I don't know about little ones at your house, but Little Miss was ecstatic when I reminded her this morning that tomorrow is Halloween.  As a result, this hairstyle was a hit.  I must say this is a spiderweb with artistic license!  I think it does look a little like one, though.  And Little Miss absolutely loved it, especially with the Halloween pony-o's that I made to go with it.  (I think she may be almost as ribbon-crazy as me these days.)  It was a little hard to get her to settle down for pics, but she finally did.  :)  The tutorial for the pony-o's is HERE.  Keep reading for the hairstyle...

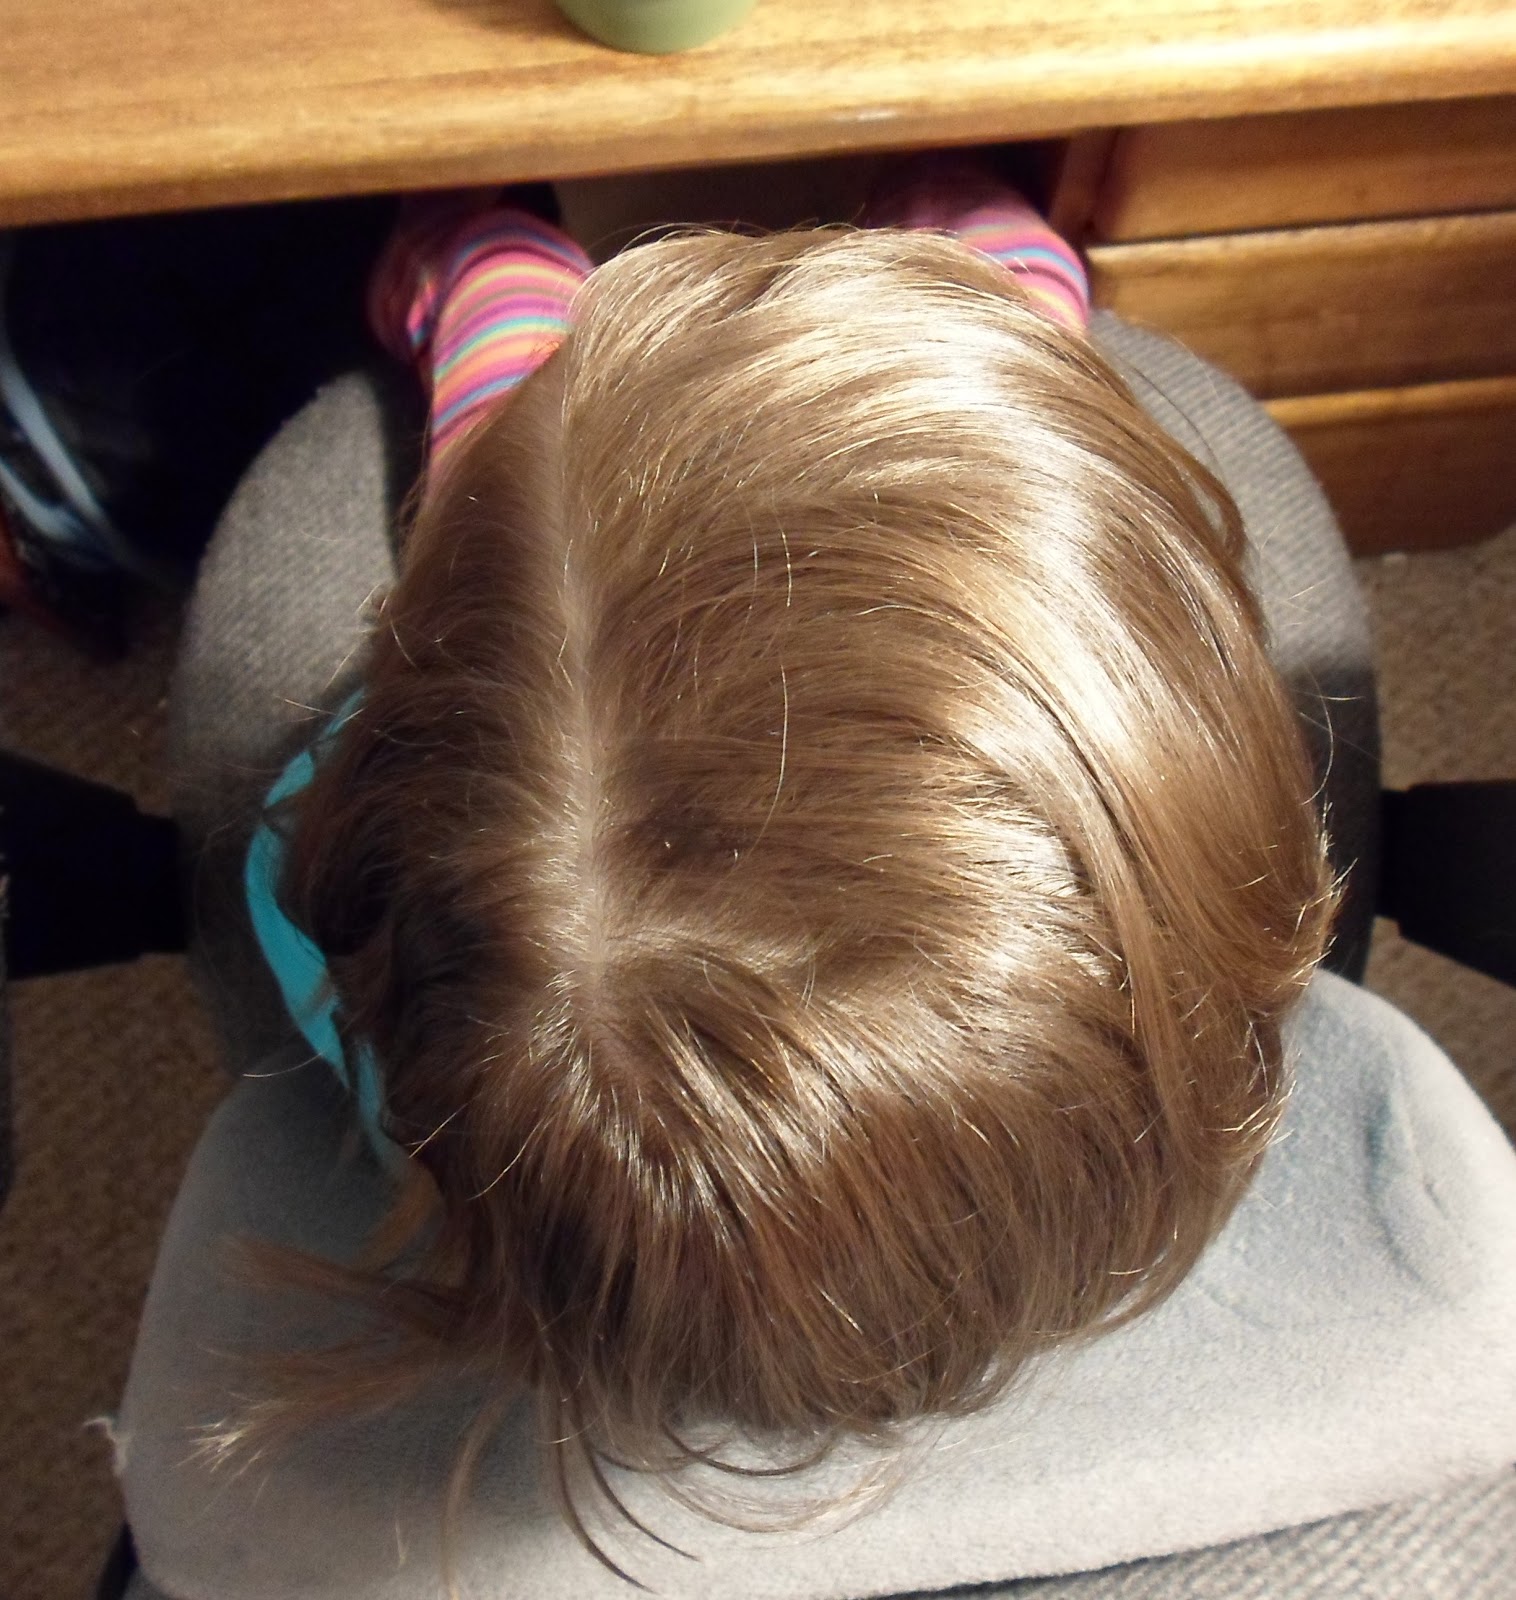
Start with a deep circle part on top of her head: 
Divide that in half, and secure with temporary hair bands: 
To one half, divide in half again, and divide each of those halves in half again.  (There will be a total of 8 sections, 4 per half.)  Tie off all of them EXCEPT the one shown in the picture as having a pink, bulkier hair band with elastics.  Tie them off as close to the outskirts of the circle as the length of hair will allow for them to still be able to reach across the circle afterwards. 
Do the same to the other side.  The temporary hair band on the left side below is white: 
Now, here's the idea:  The two sections that you have that are tied off with temporary hair bands are going to be the two pull-backs/whale spouts/whatever-you-want-to-call-them.  The three little ponies from the opposite side will cross the head to join each pull-back.  To do this, I started with the right pull-back.  I did a pull-through on the three little ponies from the other side that were going to join the pull-back, pulling them through such that they were oriented towards their destination.  See below: 
Then I twisted each strand, finally joining them all together with the pull-back.  I removed the temporary hair band and tied it all off with an elastic.  See?: 
Now for the other side, and we'll incorporate the weaving.  Do a pull-through for the three sections destined for joining the left side, again orienting the pull-through towards the pull-back they will join.  Now use your Topsy Tail on the upper two to weave them.  They should each go over one strand and under one strand from the other side, and it should be opposite of the order for the two.  Make sense? 
The furthest-back section can just cross over the opposite side; no weaving necessary.  Then twist each section, in the opposite direction of the other side, and join it all together with the pull-back.  Voila!  Finished product, sans pony-o's: 
And WITH pony-o's: 
(You can tell we had some fun here.  :)  ) 

Happy Halloween!  Stay safe and have fun!!!